MrBongoC
Install Iso Figure
Pick your agent. Every command is ready to paste.
npx skills add MrBongoC/ai-iso-skillThe open skills CLI detects your agents (Claude Code, Cursor, Codex and 70+ more) and installs to the right folder. Add -g to install globally.
01
Install it
Run the command above, or upload the folder in Claude.
02
Ask naturally
Describe the task. Your agent loads iso-figure when the request matches its description.
03
Name it if needed
If it does not trigger, say “use the iso-figure skill”. In Codex, type $iso-figure.
Interactive isometric figure
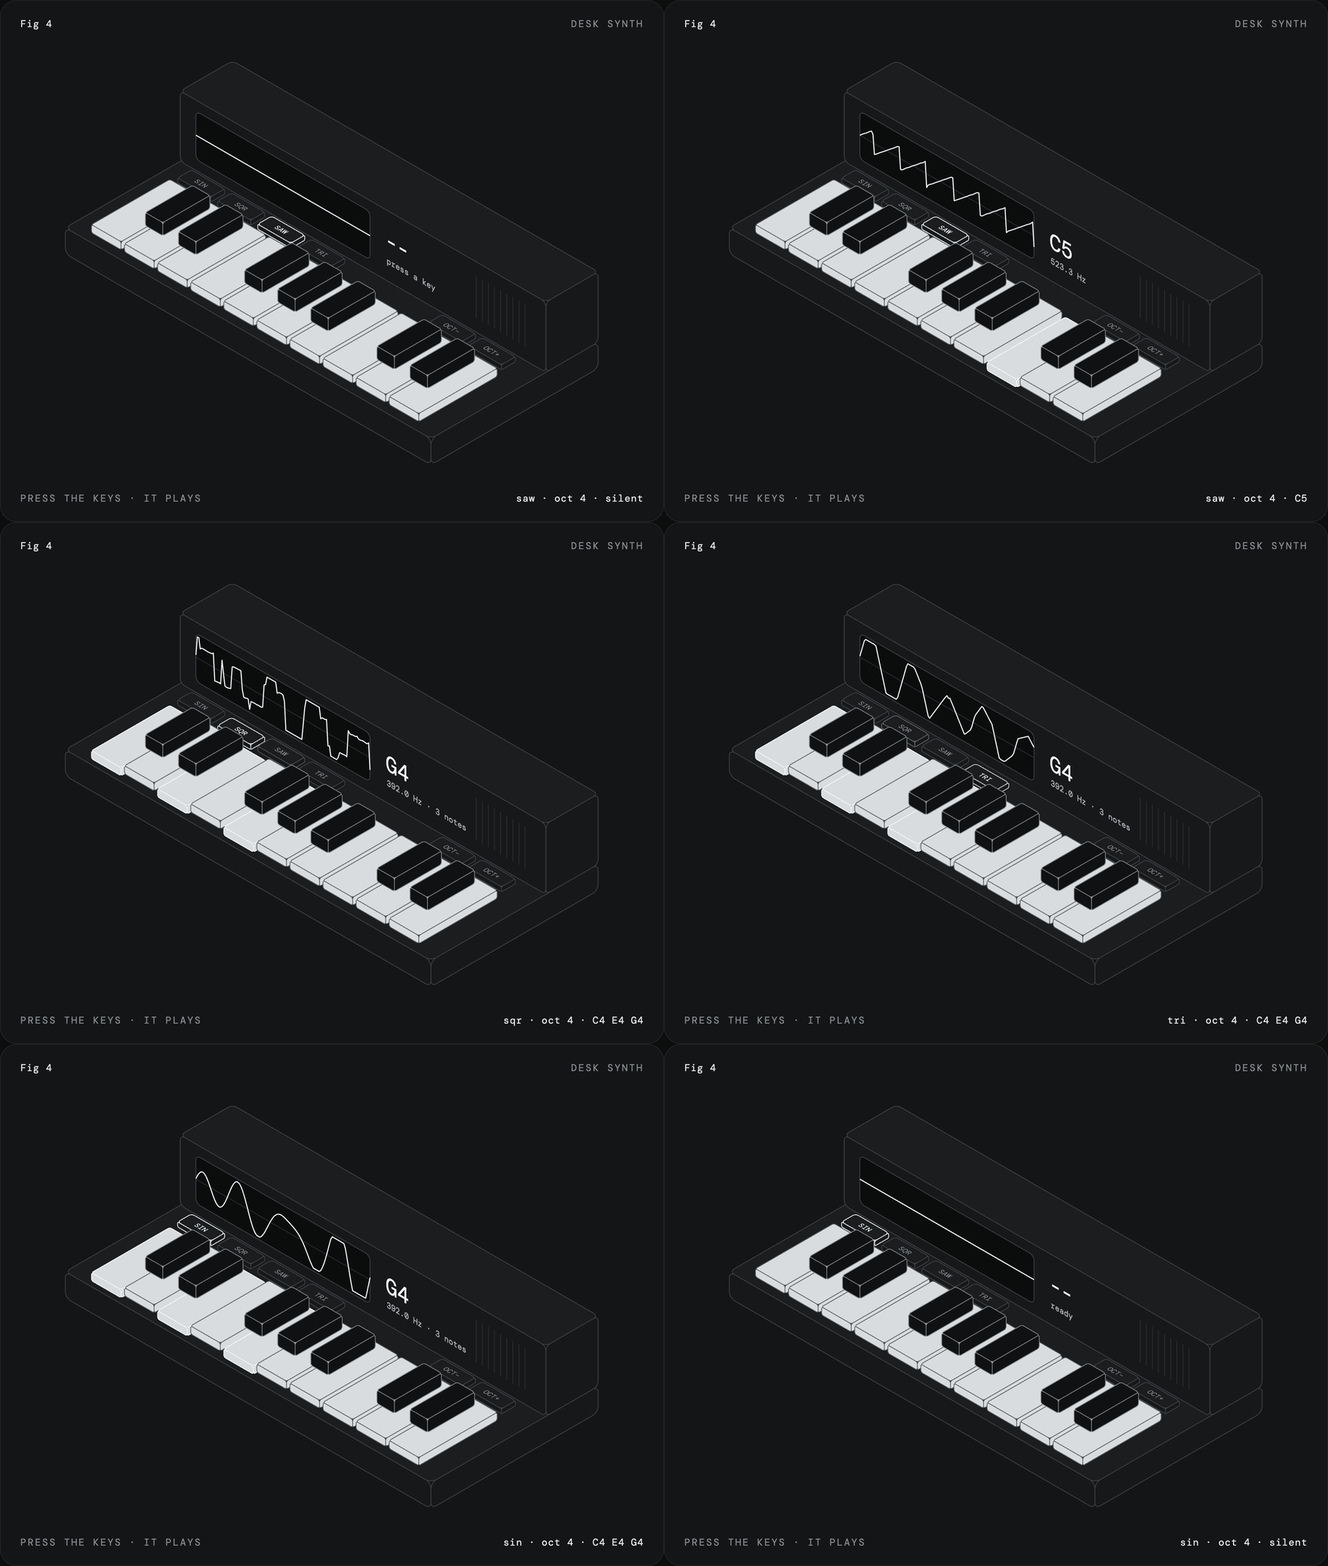
Produces one self-contained HTML file: a rounded panel captioned like a textbook plate, holding an isometric line drawing of an object whose parts actually work. A switch toggles, keys depress, a screen shows what was typed, a synth key makes sound. No libraries, no canvas, no 3D engine, just plain SVG generated by about 15 lines of projection code.
The object must do something real. A figure that only animates is decoration; a figure where pressing a part produces output (text, a number, a sound, a changed display) is the point. Decide what the output is before drawing anything.
The four things that make it work
- Everything is a flat 2D shape placed on a 3D plane. Never hand-compute skewed polygons. Draw ordinary
<rect>,<text>,<path>in a face's local coordinates and let one SVGmatrix()put it on the plane. Text, glyphs and rounded corners then sit in correct perspective for free. - Objects are boxes; a box is its three visible faces. Complex objects are boxes plus flat detail drawn on their faces (vents, slots, bezels, LEDs, labels).
- Interaction is class toggles on SVG groups. One
stateobject, onerender(); CSS does the motion. - The frame sells it. Four monospace corner captions:
Fig N(top-left), OBJECT NAME (top-right), the instruction (bottom-left), a live state readout (bottom-right).
Kernel (copy verbatim, then build the scene)
const C = Math.cos(Math.PI/6), S = Math.sin(Math.PI/6), OX = 465, OY = 300; // where the 3D origin lands in the viewBox
const P = (x,y,z) => [(x-y)*C + OX, (x+y)*S - z + OY];   // point: 3D -> screen
const D = (x,y,z) => [(x-y)*C, (x+y)*S - z];              // direction only
// plane = origin O + in-plane axes U,V. Anything inside a <g> with this transform lies flat on that plane.
const plane = (O,U,V) => { const o=P(...O), u=D(...U), v=D(...V);
  return `matrix(${u[0]} ${u[1]} ${v[0]} ${v[1]} ${o[0]} ${o[1]})`; };
const TOP   = (x,y,z) => plane([x,y,z],[1,0,0],[0,1,0]);   // z = const
const FRONT = (x,y,z) => plane([x,y,z],[1,0,0],[0,0,-1]);  // y = const (faces lower-left); pass its top-left corner
const SIDE  = (x,y,z) => plane([x,y,z],[0,-1,0],[0,0,-1]); // x = const (faces lower-right); pass its top-left corner
const rect = (t,w,h,r=0,cls='face') =>
  `<g transform="${t}"><rect class="${cls}" width="${w}" height="${h}" rx="${r}"/></g>`;
// box at (x,y,z), size w along x, d along y, h along z
const box = (x,y,z,w,d,h,r=0) =>
  rect(SIDE(x+w,y+d,z+h), d,h,Math.min(r,h/4)) +
  rect(FRONT(x,y+d,z+h), w,h,Math.min(r,h/4)) +
  rect(TOP(x,y,z+h), w,d,r,'face top');
Axes: +x runs down-right, +y runs down-left, +z is up. The viewer sees the top, the y = max face (left) and the x = max face (right). Put the "front" of the object (screen, display) on a FRONT face and anything the user reaches for (keys, buttons, dials) at larger y, in front of it.
Detail on a face: open a group with that face's transform and draw in face-local units, origin at the face's top-left.
svg += `<g transform="${FRONT(70,190,240)}">
<rect class="face glass" x="28" y="31" width="124" height="104" rx="12"/>
<text x="38" y="112" font-size="8.5">> hello</text>
</g>`;
Required CSS
.face   { fill:var(--body); stroke:var(--line); stroke-width:1; vector-effect:non-scaling-stroke; stroke-linejoin:round; }
.face.top { fill:var(--deck); }
.detail { fill:none; stroke:var(--detail); stroke-width:1; vector-effect:non-scaling-stroke; }
.press { cursor:pointer; transition:transform 60ms ease-out; }
.press.down { transform:translateY(4px); }
.press.down .face { stroke:var(--live); }
vector-effect:non-scaling-stroke is not optional. Without it the matrix skews stroke widths and the hairline look is lost. Faces must have an opaque fill: painter's-order occlusion depends on it.
Procedure
- Name the output. What does pressing a part produce? Typed text, an arithmetic result, a note, a toggled light. Everything else serves that.
- Decompose the object into 3-8 boxes. Write their
(x,y,z,w,d,h)as a small table first. Pick the pressable parts and the one surface that displays state. - Emit back to front. Paint order is the only depth sorting: smaller
x+yfirst, lowerzfirst. For grids (keys, buttons) loop rows by increasingy, then columns by increasingx. Parts that sit on top of others (black piano keys over white) go after everything beneath them. - Wrap each pressable part in its own
<g class="press" data-…>containing its box and its label. A label drawn on the part's TOP plane inside the same group moves with it when pressed. - Frame it numerically. Project the scene's extreme corners with
P, then setOX/OYandviewBoxfor roughly 8-15% margin on every side. Eyeballing clips tall objects. - Wire state. One
stateobject, onerender()that toggles classes and rewrites the display and readout. Pointer and keyboard input call the same functions. - Motion in CSS only. Pressed part:
translateY(4px)(straight down on screen is −z in iso) over about 60ms, stroke flashing to the live colour. Honourprefers-reduced-motion. - Readout in the bottom-right, terse and lowercase, dot-separated:
off→on · 9 chars · key t. It changes on every interaction. - Verify in a browser. Load it headless, drive it with real key presses and mouse presses at projected coordinates, read back the readout, and screenshot one interacted state. Check nothing is clipped, nearer parts cover farther ones, and there are no console errors.
Input patterns
Keyboard and pointer share one handler:
const keys = new Map([...stage.querySelectorAll('.key')].map(k => [k.dataset.key, k]));
function press(k) {
  const el = keys.get(k); if (!el) return false;
  el.classList.add('down'); setTimeout(() => el.classList.remove('down'), 110);
  /* …update state… */ render(); return true;
}
stage.addEventListener('click', e => { const k = e.target.closest('.key'); if (k) press(k.dataset.key); });
window.addEventListener('keydown', e => {
  if (e.metaKey || e.ctrlKey || e.altKey) return;
  if (press(e.key.length === 1 ? e.key.toLowerCase() : e.key)) e.preventDefault();
});
For parts that are held rather than tapped (instrument keys): use pointerdown / pointermove / pointerup on the svg with setPointerCapture, find the part under the pointer with document.elementFromPoint(...).closest('.key') so dragging across parts works, set touch-action:none on the svg, ignore e.repeat on keydown, and release everything on window blur.
For text typed onto a screen: show only the tail of the buffer, clip with a <clipPath> matching the glass rect, and escape & and < before writing into the SVG.
For sound: create the AudioContext inside the first press handler (browsers block it before a gesture), route through one master gain into an AnalyserNode, and draw the analyser's time-domain data as a <polyline> on the screen face each animation frame, starting from a rising zero crossing so the trace holds still.
Look
- Define every colour as a CSS custom property and provide both a dark and a light set; the drawing works in either. Dark: panel
#141516on page#0c0d0e. Light: panel#f6f6f5on page#e9eaea. - Two greys only for linework (structure and detail). One near-white (near-black in light theme)
--livecolour reserved for whatever is live: lit display content, the pressed key, the selected button. That contrast is the whole effect; do not add hue, gradients or shadows. - Two-tone parts (white and black keys, digit and operator keys) are allowed as light fill with dark stroke versus dark fill with light stroke.
- Captions: monospace, 13px, wide letter-spacing, uppercase except
Fig Nand the readout. Lay the two caption rows out with flex and wrapping so they survive phone width. - Small radii on boxes (2-14 units). Side-face radius is clamped to
h/4in the kernel so thin slabs don't turn into lenses. - Texture from repetition, not shading: vent slits, key grids, ribbed lines.
Don'ts
- No real company logos, product silhouettes or trademarked marks on the object or its screen; use the owner's own mark or an invented glyph.
- No hand-written skewed polygon coordinates. If you are typing point lists for a face, use
plane()instead. - No external scripts; the file must run opened from disk.
- Don't build something you only watch. If the user can't press it and get output, pick a different object.
- Give the svg
role="img",tabindex="0"and anaria-labelstating what it is and how to operate it.
Tips for Iso Figure
- • Start a fresh session after installing so your agent picks up the new skill.
- • If two skills overlap, mention the one you want by name.
Questions about Iso Figure
What does the Iso Figure skill do?
Build an interactive isometric line-art "figure" (Fig N style) of an object in a single HTML/SVG file: monochrome technical-illustration look, parts you can press that produce real output, live state readout. Use for hero illustrations, interactive diagrams, product figures, and playable desk objects (computer, synth, calculator).
How do I install Iso Figure?
Run "npx skills add MrBongoC/ai-iso-skill" in your project. The skills CLI installs it for Claude Code, Cursor, Codex and 70+ other agents. In Claude on the web, upload the skill folder as a ZIP under Customize > Skills.
Does Iso Figure work in Cursor and Codex?
Yes. Iso Figure uses the open SKILL.md format, so it works in Claude Code, Claude, Cursor, OpenAI Codex, Gemini CLI, GitHub Copilot and other agents that support agent skills.
Is Iso Figure free?
Iso Figure is open source on GitHub under the MIT license. It is free to install; check the license before commercial use.
Who made Iso Figure?
Iso Figure is published by MrBongoC in the MrBongoC/ai-iso-skill repository.